
Cart is empty
Lock50 HW04 User Manual V1.3.1.1 — 9. Troubleshooting
Original manual pages are preserved below. PDF page numbers refer to the original file; printed labels are shown separately. Use “Full-size view” for close inspection, or “Read original page text” on smaller screens.
All chapters and subsections
- Contents
- Warranty, Safety and Copyright
- 1. Introduction
- 2. Getting Started
- 3. Introduction to Lock50 Software
- 4. Alarm-Off
- 5. Key Copy
- 6. Add Spare Key
- 7. Service Functions
- 8. JLR Vehicles Supported
- 9. Troubleshooting
-
10. Lock50 Change-ID Keys
- 10.1 Working with Lock50® HW05-A Change-ID Keys
- 10.2 Working with Lock50® HW05-B Change-ID Keys
- 10.1 Working with Lock50® HW06-A Change-ID Keys
- 10.2 Working with Lock50® HW06-B Change-ID Keys
- 10.3 Working with Lock50® HW13 Change-ID Keys
- 10.3 Working with Lock50® HW14 Change-ID Keys
- 10.4 Working with HW07 OEM Change-ID Keys
- 10.4 Working with HW08 OEM Change-ID Keys
- 10.5 Working with HW09 OEM Change-ID Keys
- 10.5 Working with HW10 OEM Change-ID Keys
- 10.6 Working with HW11-A Land Rover Defender Change-ID Keys
- 10.6 Working with HW11-B Land Rover Defender Change-ID Keys
- 10.6 Working with HW12-A Land Rover Defender Change-ID Keys
- 10.6 Working with HW12-B Land Rover Defender Change-ID Keys
- 10.7 Working with HW15 PEPS, Non-UWB, OEM Keys
- 10.7 Working with HW16 PEPS, Non-UWB, OEM Keys
- 10.8 Working with HW17 PEPS, Non-UWB Aftermarket Keys
- 10.8 Working with HW18 PEPS, Non-UWB Aftermarket Keys
- 10.8 Working with HW19 PEPS, Non-UWB, JLR OEM Keys
- 10.8 Working with HW20 PEPS, Non-UWB, JLR OEM Keys
- 10.8 Working with HW21, PEPS/UWB, JLR OEM Keys.
- 10.8 Working with HW22, PEPS/UWB, JLR OEM Keys.
- 10.8 Working with HW23, PEPS/UWB, JLR OEM Keys
- 10.8 Working with HW24, PEPS/UWB, JLR OEM Keys.
- 10.9 Working with HW25, PEPS/UWB, JLR OEM Keys
- 10.9 Working with HW26, PEPS/UWB, JLR OEM Keys
- 11. Cables
- 12. Control Modules
- 13. JLR Diagnostics Software
- 14. JLR Coding Software
- 15. JLR DoIP VCI
- 16. Laptop Computers
- 17. Pelican Cases
- 18. HW04 Software License and Support Plan
- 19. Glossary of Terms, Abbreviations and Acronyms
Jump to any original PDF page (1–118)
9.1 Software & identification
Software installation steps
Note: The Setup JLR KeyTool executable file (.exe) must be executed for the installation to complete otherwise the software and hardware will not function correctly.
Mfc100u.dll file missing
If you get this error Mfc100u.dll file missing then follow guide below
Download the Microsoft Visual C++ 2010 Service Pack 1 Redistributable Package MFC Security Update
How do I handle the 2017–2020 overlap years?
- Do not identify by casing or blade: Older-type keys can use newer-type cases.
- HW04 Reader Scan: Read the customer's key with the Lock50 reader and identify the actual transponder type: SW01 for PCF7953, SW02 for the supported NCF29A family. The key read does not establish the vehicle module lock states.
- OBD module identification: Read the keyless-module assembly part number over OBD. Older KVM assembly part-number prefixes include FK72 and HPLA; newer RFA assembly part-number prefixes include JPLA, K8D2 and M9R3. Use the actual module identification, not the key case.
How do I distinguish a locked key, locked KVM/RFA and locked BCM?
There are three separate MCU/chip lock states: the key transponder, the KVM/RFA module and the BCM. A lock on one part does not tell you the lock state of the others.
- Locked key: The lock belongs to the key transponder itself. Read the customer's key with the Lock50 reader; this is not a vehicle-module status check.
- Locked KVM/RFA: This is the lock state of the keyless module, separate from the key and BCM.
- Locked BCM: This is the Body Control Module's own lock state. An unlocked RFA does not mean the BCM is unlocked.
When the vehicle is open and the alarm is disarmed:
- Connect the HW03-D (Dual CAN) or HW03-E (DoIP) cable to the vehicle OBD-II port.
- Switch ignition ON (Position 2).
- Open RFA Utils in Lock50 software and check the BCM and RFA locked/unlocked statuses separately.
- Choose the function from the actual module states, not the country or key casing. For RFA replacement worldwide, check the actual RFA and BCM lock states in RFA Utils, not the country. When both the RFA and BCM are unlocked, Replace RFA virginises the RFA and removes all old keys; you can then add keys back. In this supported case, the command does not mean you must physically fit another RFA. If the BCM is locked, the replacement route is Special Functions > Replace RFA. This requires HW04-B or higher and the HW03-E DoIP cable. The DoIP cable usage licence is included with HW04-B and higher tools. Do not use the standard unlocked-BCM route.
9.1 Software & identification — continued
How do I identify whether a vehicle has Type 1 (KVM) or Type 2 (RFA) keys?
Older-type keys can be fitted into newer-type cases. Casing or emergency-blade shape does not prove the transponder type or whether the vehicle uses KVM or RFA. Read the customer's key with the Lock50 reader to identify the actual transponder, or read the vehicle over OBD and check the keyless-module assembly part number.
9.2 Key learning & module locks
What should I do if Lock50 software reports "Need 2 Keys" during module replacement?
Keep adding keys (SW30), unlocking the RFA (SW40) and finishing a replacement module separate. A replacement-module prompt is not an SW30 or SW40 eligibility check. SW30 adds any key type suitable for the vehicle over OBD, including OEM and non-OEM keys. On locked EVA2, it requires two working keys detected by the vehicle or active service mode. It adds keys without erasing existing keys or unlocking the RFA. Place both keys inside the car at the same time and run RFA Check Keys. Confirm that the vehicle detects two keys; owning two fobs or seeing two stored key slots is not enough. Telematics Phase 4 Plus: SW40 cannot unlock the RFA over OBD or CAN wires unless Check Keys detects two keys together inside the car. Run Check Keys before choosing the unlock route. Service mode is an alternative for SW30 add-key, not a substitute for this SW40 two-key requirement.
- Navigate to Special Functions → "Replace RFA/KVM" (available in HW04-B, C, and C+ packages).
- For a replacement module, follow the applicable Replace RFA/KVM workflow and its on-screen instructions. Do not assume it creates extra recognised keys or bypasses the SW40 Check Keys requirement.
Check eligibility before ordering
- Choose unlocked KVM/RFA for an unlocked module on any supported model, or locked EVA2 for an eligible EVA2 vehicle with Pivi Pro. A supported module configuration and compatible key of the correct frequency are required. The unlocked option does not unlock a locked module.
- For the locked-EVA2 direct-learning route, RFA Check Keys must detect two working keys together in the vehicle, OR service mode must be active. Supported unlocked-module jobs follow their normal vehicle/key-learning requirements; do not apply the locked-EVA2 condition to every unlocked vehicle. Two stored key slots or merely owning two fobs is not a passed detection check.
- Service mode does not override UWB/key compatibility. Buying a token does not unlock every RFA, bypass gateway access requirements or make an unsupported vehicle compatible.
- If unsure, confirm the vehicle, RFA/BCM configuration and intended key with Lock50 before ordering.
Optional SW30 bonus after SW36 copying — EVA2 with Pivi Pro only
The optional SW36-to-SW30 same-job bonus applies only to supported locked EVA2 models with Pivi Pro. Standalone SW30 also supports normal key learning on supported unlocked KVM/RFA; that unlocked route is not restricted to Pivi Pro. On other supported models, when the RFA or KVM is locked, these routes provide key copying only — not this SW30 OBD add-key benefit.
- Copy first with SW36 using the supported Change-ID key and adapter route for that vehicle.
- Run OBD RFA Check Keys with both working keys together inside the vehicle. It must detect two working keys; two owned fobs or two stored slots do not prove detection.
- Where eligible, use SW30 to learn a compatible fixed-ID key, which may be a lower-cost key or an appropriate OEM key. Confirm the exact key and vehicle route before proceeding.
This is an optional same-job money-saving benefit with no extra SW30 charge where eligible, including eligible PAYG SW36-token jobs — not a guaranteed copy-plus-learning bundle for every vehicle. Where a suitable fixed-ID key is successfully learned and checked, it can be supplied to the customer so the Change-ID key can be retained and reused on the next compatible job.
9.2 Key learning & module locks — continued
Specific UWB-on route
Specific UWB-on route: on a supported locked EVA2 RFA with Pivi Pro, SW36 copy first → Check Keys confirms two detected working keys → SW30 learns fixed-ID HW17/HW18 as key 3. UWB can remain on for this specific route. HW17/HW18 are non-OEM PS/PEPS keys with keyless entry/start, not UWB or walk-away keys. This does not unlock the RFA or adapt a replacement module.
Do not confuse this with direct learning or a new RFA: without copying first, direct SW30 learning requires two detected working keys OR active service mode and a compatible key. For direct learning with UWB on, use a compatible fixed-ID UWB key such as OEM HW21–HW28, subject to exact fitment. OEM HW27/HW28 do not require SW36 first. HW29/HW30 are non-OEM Change-ID keys for SW36 copying, not direct fixed-ID learning keys. Non-OEM fixed-ID HW31/HW32 use simulated UWB and require SW36 first on their supported locked-EVA2 route. With a non-UWB configuration, compatible HW15–HW20 may be learned. On a new RFA in a UWB car, turn UWB off to learn non-UWB HW15–HW20, including HW17/HW18. Service mode does not waive key/UWB compatibility.
Check Keys before starting
Before starting SW30 or SW40, run RFA Check Keys in the vehicle. Complete this check before running the function; a desktop key-reader result is not a substitute.
Reader check versus vehicle detection: Reading a key on the Lock50 reader checks the key itself; it does not prove that the vehicle can detect it. RFA Check Keys checks which keys the vehicle actually detects. When checking for two keys, put both keys inside the car at the same time and confirm that Check Keys detects two, rather than relying on stored key slots or possession of two fobs.
If Check Keys disconnects: A communication loss does not automatically mean a faulty key. Vehicle or dashboard sleep is one possible cause, not a confirmed diagnosis. Follow the software ignition instructions, restore communication and rerun Check Keys before relying on the result.
9.3 Remote, keyless & alarm issues
Rolling Code Synchronisation during RFA Replacement. NRC (33). Security Access Denied.
Rolling Code Synchronisation during RFA Replacement. NRC (33). Security Access Denied. This operation could not be completed because the PRDM module had uncleared DTC’s. If similar errors occur, select Skip to complete the operation then open the main modules page. From all modules, select BCM, then run Rolling Code Synchronisation.

HW13/HW14 — automatic approach/walk-away locking or unlocking
HW13/HW14 do not provide automatic approach/walk-away locking or unlocking. For that function on a compatible vehicle, use OEM fixed-ID HW27 (433 MHz) / HW28 (315 MHz) for OBD adding, or non-OEM Change-ID HW29 (433 MHz) / HW30 (315 MHz) for SW36 copying. Walk-away locking and approach unlocking require supporting vehicle hardware and enabled CCF settings.
Recommended damaged-TCU method: disable protection, keep TCU fitted
- The vehicle has a damaged TCU or damaged/disconnected TCU cables, and only the main TCU connector remains attached.
- The IPC/dashboard displays an error and keyless operation with the keys is not working.
Disable TCU / Telematics Protection in the CCF while retaining the correct TCU-fitted configuration. These are different settings. For this supported repair, keep the damaged TCU installed with only its main connector attached. This protection-setting method does not require full-car re-immobilisation.
Do not select “TCU not fitted” as a shortcut. Changing the configuration to “TCU not fitted” requires the whole car to be re-immobilised. Lock50 does not currently support the full-car immobilisation function. Use the protection-setting method instead.
- An HW04-C or HW04-C+ with the built-in CCF editor for SW26, the vehicle VIN and its current CCF configuration. Retain the original configuration before editing.
- Use the vehicle-specific Telematics Protection setting, keeping the TCU-fitted selection appropriate to the installed unit. Do not confuse protection with “TCU not fitted”, TCU connectivity or remote app lock/unlock settings.
- The CCF protection edit clears the SOS error in this damaged-TCU repair configuration. Test keyless operation with the same existing keys.
- Only if keyless still fails, use SW36 with those same keys. If keyless already works, SW36 is not needed. Existing SW36 licence and connection requirements still apply.
Why must all EVA2 models use SW36 for ARM OFF instead of CAN wires?
All EVA2 models require SW36 for ARM OFF. The CAN-wires ARM OFF method applies only to supported pre-EVA2 models; it does not work on EVA2. Identify the vehicle architecture rather than relying on model year alone.
9.4 Licences, activation & tokens
Who should order this token?
For existing Lock50 HW04-PAYG tool owners only. Enter your existing tool serial number and confirm your PAYG package when ordering. HW04-A, A+, B, C and C+ already include SW30, subject to their licence and vehicle requirements; those owners do not need to buy this token.
This is an SW30 OBD key-learning token, not an SW36 key-copying token, a tool upgrade or permanent access. It does not include physical keys, hardware, RFA replacement, SW26 or SW40.
Ordering and activation
- Check the module condition, then select the locked-EVA2 or unlocked-KVM/RFA job with the 1-key or 2-key allowance for one vehicle. The allowance does not override available key slots or the specific key-3 restriction.
- Select Job Urgency and enter the existing HW04-PAYG serial to activate. Confirm that this is a PAYG tool.
- Wait for activation confirmation before starting. The 24-hour use window begins at activation, not at order placement. Ordering notice and the use window are separate.
- Run the relevant vehicle/key checks and the SW30 OBD learning procedure. Check each learned key's supported start, remote and keyless functions before handing the vehicle back.
Token limits
The token is charged/consumed on activation, not only on job success. It is for one vehicle and the purchased key allowance, within the activation window. Failed retries do not consume a successful-key allocation, but they do not extend the window. An expired activation requires a new token. Tokens are non-refundable under the existing token terms; no unlimited use or permanent SW30 licence is included.
No-copy PAYG jobs
No-copy PAYG jobs: use the separate SW30 Add Key via OBD Token where eligible. Do not buy a second SW30 token for an eligible same-job SW36 bonus. A/A+/B/C/C+ retain their included SW30 entitlement, subject to licence and vehicle requirements.
For paid-token jobs, existing activation, 24-hour use window, one-vehicle and purchased key-allowance limits remain unchanged. Tokens are consumed on activation; the bonus is not unlimited or permanent SW30 access and does not grant SW26 or SW40. Verify the learned key's supported functions before customer handover.
9.5 GWM security & support
SW28 / SW30 — GWM Secure Diagnostics lock
Latest security-updated models: SW28 does not bypass the GWM Secure Diagnostics lock.
For SW28 and SW30 on vehicles with the latest GWM security updates, you must log in to TOPIx Cloud once to open the gateway before proceeding. These operations cannot be completed through the locked gateway without that TOPIx login.
A dedicated GWM function is planned soon.
SW36 — GWM-locked models
SW36 is unaffected and works on GWM-locked models using the HW03-C
locked GWM bypass cable.
How do I request support if the vehicle does not recognise its keys?
For technical assistance, sign in to your Lock50 account, open the relevant order and select Ask a Question about this Order.
Please include your tool serial number, vehicle model and year, full VIN, a clear description of the issue, and any error codes or relevant screenshots in one message. If you purchased through a reseller, please contact that reseller first.
Order messaging is not live chat. Typical replies take 24–48 working hours. See the Lock50 Support page for the support process and booking arrangements.
SW30 OBD key learning — licence and vehicle requirements
SW30 is included with HW04-A, A+, B, C and C+, subject to licence and vehicle requirements. For standalone PAYG learning, use the SW30 Add Key via OBD token; an SW36 copying token is not required for a no-copy job.
On supported locked EVA2/Pivi Pro vehicles, direct learning requires RFA Check Keys to detect two working keys together OR active service mode. Key frequency, module and UWB compatibility still apply; stored slots or possession of two fobs are not detection. Supported unlocked KVM/RFA jobs follow their normal learning requirements.
- Service mode does not override UWB/key compatibility. Buying a token does not unlock every RFA, bypass gateway access requirements or make an unsupported vehicle compatible.
PDF page 65 · Printed page: 64
Read original page text
 Lock50® HW04 JLR Technical Tool User Manual
64
2025
9. TROUBLESHOOTING
www.lock50.co.uk
T he IAU module is located on the inside of
the steering column, and is installed with a bolt.
The RFA module is located in the boot space,
above the wheel arch, on the right side or the left
side of the vehicle.
Note: use Topix Cloud for vehicle documentation to identify the location of control modules,
antennas, and other vehicle components.
Original illustrations from PDF page 65


9. IAU locations — Under the steering column

| Model / generation / years | IAU or backup-reader position |
|---|---|
| Range Rover Sport L494 · 2014–2022 | Manually adjusted column: underneath. Electric column: see next page. |
| Discovery 5 L462 · 2017–2020 | Manually adjusted column: underneath. Electric column: see next page. |
| Evoque L538 · 2012–2019; L551 · 2020–2026 | Underneath the steering-column cover. |
| Discovery Sport L550 · 2015–2026 | Underneath the steering-column cover. |
| Discovery 4 / LR4 L319 · 2010–2016 | Underneath. North American 2013: not confirmed. |
| Freelander 2 / LR2 L359 · 2013–2015 | Ribbed recess underneath the lower column cowl. |
| Velar L560 · 2021–2026 | Underneath the steering-column cover. |
| E-PACE X540 · 2018–2024; I-PACE X590 · 2019–2024 | Underneath the steering-column cover. |
9. IAU locations — Side of the steering column

| Model / generation / years | IAU or backup-reader position |
|---|---|
| Range Rover L405 · 2013–2022 | Side of the steering column. |
| Range Rover Sport L320 · 2013 | Side of the steering column. |
| Range Rover Sport L494 · 2014–2022 | Electrically adjusted column: side. Manual column: underneath. |
| Discovery 5 L462 · 2017–2020 | Electrically adjusted column: side. Manual column: underneath. |
| Velar L560 · 2018–2020 | Side of the steering column. |
| Jaguar XF X260 · 2016–2020 | Side of the steering column. |
| Jaguar XE X760 · 2016–2019 | Side of the steering column. |
| Jaguar F-PACE X761 · 2017–2020 | Side of the steering column. |
9. IAU locations — Cup holder / USB switchpack

| Model / generation / years | IAU or backup-reader position |
|---|---|
| New Range Rover L460 · 2022–2026 | Slide the cup holder backward. The key-reading position is on the marked USB switchpack. |
| New Range Rover Sport L461 · 2023–2026 | Slide the cup holder backward. The key-reading position is on the marked USB switchpack. |
| Range Rover Sport L494 · 2022 | Not this cup-holder position. Use the steering-column position for the fitted column type. |
9. IAU locations — Lower dashboard / fascia
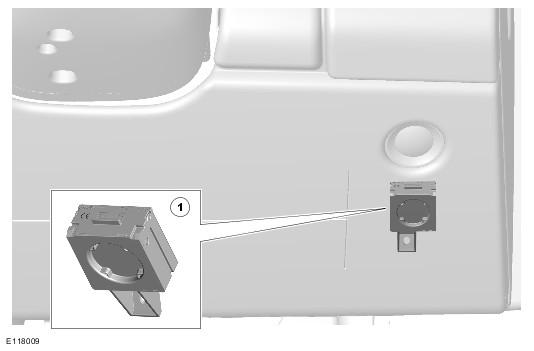

| Model / generation / years | IAU or backup-reader position |
|---|---|
| Range Rover L322 · 2011–2012 | Under the instrument panel, outboard of the column; behind the trim, below the footwell lamp. |
| Range Rover Sport L320 · 2012 | Under the fascia, outboard of the column, at the ribbed target area. Do not apply the 2013 side-column position to it. |
| Jaguar XF X250 · 2013 | Fascia below the auxiliary switchpack. |
| Jaguar XF X260 · 2021–2023 | Underside of the fascia. |
| Jaguar XJ X351 · 2012–2019 | Lower fascia, below the auxiliary switchpack on earlier versions. |
| Jaguar F-TYPE X152 · 2014–2024 | Lower fascia / underside of the fascia. |
| Jaguar XE X760 · 2020–2024; F-PACE X761 · 2021–2026 | Underside of the fascia. |
9. IAU locations — Not confirmed
| Model / generation / years | IAU or backup-reader position |
|---|---|
| Defender L663 · 2020–2026 | 2020: underneath the lower steering-column cover. 2021–2026: not confirmed. |
| Discovery 5 L462 · 2021–2026 | Exact side/underside position: not confirmed. |
| Locations not confirmed | Not confirmed: L322 2010; L320 2010–2011 exact placement; L359 2010; XF X250 2011/2014/2015; XF X260 2024; XJ X351 2010–2011; XK X150 2011/2014/2015; XE X760 2015. |
| Other years not confirmed | Classic Defender 2010–2012/2016; Discovery 3 or XJ X350 in 2010; E-PACE and I-PACE 2025–2026. |
PDF page 66 · Printed page: 65
Read original page text
 Lock50® HW04 JLR Technical Tool User Manual
CAN high
CAN low
65
2025
www.lock50.co.uk
T he CAN2 network is used to disarm the
vehicle and can be found located on the side
pillar of the passenger door (in most vehicles).
Note: use Topix Cloud for vehicle documentation
to identify the location of the CAN2 bus on vehicles.
The HS CAN bus consists of a twisted-pair, and is
colour coded: Green is CAN high. Yellow is CAN low.

All EVA2 models require SW36 for ARM OFF. The CAN-wires ARM OFF method applies only to supported pre-EVA2 models; it does not work on EVA2. Identify the vehicle architecture rather than relying on model year alone.

Connect the HW03-B adapter to the CAN wires in the car (or the door modules for the EVA2 RFA-unlock route).
Connect your Lock50 HW04 OBD tool to the HW03-B cables.

HW03-B CAN-wires adapter — new V2 design .
Original illustrations from PDF page 66


PDF page 67 · Printed page: 66
Read original page text
 Lock50® HW04 JLR Technical Tool User Manual
66
2025
www.lock50.co.uk
BCM warning prompt when adding a key.
BCM routine completed with invalid return code. Return Code: Less Than 2 Keys Found. This error occurs when synchronising a new RFA module to a car with a locked BCM. With HW04-B or higher, use SW28 via OBD: Special Functions > Replace RFA when BCM is locked.
Read DTC prompt during RFA Replacement.
Read DTC prompts with Diagnostic Error (21009): ECU didn’t respond. Check that the ignition is on. If there are no keys, press the START button to wake the car dashboard, then retry.
Rolling Code Synchronisation during RFA
Replacement. NRC (33). Security Access Denied.
This operation could not be completed because
the PRDM module had uncleared DTC’s. If similar
errors occur, select Skip to complete the operation
then open the main modules page. From all modules, select BCM, then run Rolling Code Synchronisation.

Prevent Windows Defender from deleting the Lock50® software application automatically.
Open Windows Defender.
Virus & Threat Protection Settings.
Scroll down to Exclusions and select Add or Remove Exclusions.
Select Folder: C:Program Files, Lock50 Software to prevent Windows Defender from deleting it.
Original illustrations from PDF page 67


PDF page 68 · Printed page: 67
Read original page text
 Lock50® HW04 JLR Technical Tool User Manual
67
2025
www.lock50.co.uk
ECU Software Update error prompt.
Error (20486): File Server Error. On some models, the server As-Built file may be missing or corrupted. For CCF editing, read the As-Built information directly from the car without a downloadable file. New-RFA flashing without a server As-Built file is also supported on the latest supported models; this capability was added in a recent software update. On latest models with a locked GWM, log in to TOPIx Cloud to open the gateway before CCF editing or RFA replacement.
Key Duplicator warning when duplicating a key.
Application Error (20499): Missing License. Check that the required Key Duplicator licence is present. If you already have the licence, close and reopen the program. Scan the car over OBD first to wake all modules, then retry key duplication.
Network Integrity Test warning using DoIP cable.
Network Integrity Test prompts with DoIP
Connection Error (21011): Missing License. This
occurs on HW04A devices where flashing where
HW03E DoIP Ethernet cable is not supported and
requires a license or upgrade to the HW04B device.
Original illustrations from PDF page 68


